> For the complete documentation index, see [llms.txt](https://docs.sharinpix.com/llms.txt). Markdown versions of documentation pages are available by appending `.md` to page URLs; this page is available as [Markdown](https://docs.sharinpix.com/documentation/sharinpix-form/automatic-form-url-generation-using-flow-admin-oriented.md).
# Automatic Form URL Generation using Flow (Admin-Oriented)
## Overview
The `GenerateFormUrlAutomation` class is an **Invocable Apex** utility that allows Salesforce Admins to automatically generate secure **SharinPix Form URLs** directly from **Flows**.
The generated URL opens a SharinPix Form on the SharinPix Mobile App or on a Web Browser for users to fill out.
This article covers the following:
1. [GenerateFormUrlAutomation's Input Parameters](/documentation/sharinpix-form/automatic-form-url-generation-using-flow-admin-oriented.md)
2. Flow Configuration Guide
* [Step 1: Prepare Custom Field To Store URL](/documentation/sharinpix-form/automatic-form-url-generation-using-flow-admin-oriented.md#step-1-prepare-custom-field-to-store-url)
* [Step 2: Configure a Record-Triggered Flow](/documentation/sharinpix-form/automatic-form-url-generation-using-flow-admin-oriented.md#step-2-configure-a-record-triggered-flow)
* [Step 3: Add the Action to Generate the Form Url](/documentation/sharinpix-form/automatic-form-url-generation-using-flow-admin-oriented.md#step-3-add-the-action-to-generate-the-form-url)
* [Step 4: Add Update Element](/documentation/sharinpix-form/automatic-form-url-generation-using-flow-admin-oriented.md#step-4-add-update-element)
* [Step 5: Save and Activate the Flow](/documentation/sharinpix-form/automatic-form-url-generation-using-flow-admin-oriented.md#step-5-save-and-activate-the-flow)
* [Step 6: Find the SharinPix Form URL](/documentation/sharinpix-form/automatic-form-url-generation-using-flow-admin-oriented.md#step-6-find-the-sharinpix-form-url)
3. [Demo](#demo)
{% hint style="warning" %}
**Prerequisites**
Before configuring this automation, ensure the following:
* You have the latest **SharinPix Package** installed. This feature requires version **1.376** or higher. You can follow [this guide](https://github.com/SharinPix/documentation/blob/main/m/FAQ/l/1236928-how-to-update-sharinpix-package-from-the-appexchange/README.md) to upgrade your SharinPix Managed Package to the newest version.
* Users must have the **SharinPix Forms** **Admin** or **SharinPix Forms User** permission set assigned. For more information on these two permission sets, check [SharinPix Permission Sets](/documentation/access-and-security/sharinpix-permission-sets.md).
* A form template has been created using the [SharinPix Form Template Editor](/documentation/sharinpix-form/sharinpix-form-template-editor.md).
{% endhint %}
## Input Parameters
Below are the inputs required when using the `GenerateFormUrlAutomation` invocable method in a Salesforce Flow. These parameters must be provided to successfully generate a SharinPix Form URL.
| Parameter | Description |
| ---------------- | ------------------------------------------------------------------------------------------------------------------------------------------------------------------------------------------------------------------------------------------------------------------------------------------------------------------------------------------------------------------------- |
| recordId | The Salesforce Record ID (e.g. Work Order ID) to which the form url will be associated. *(Required)* |
| formTemplateId | The **Name** of the SharinPix Main Form Template for which you want to generate the SharinPix Form Url. *(Required)* |
| nameFieldApiName | API name of a field on the record (e.g. `WorkOrderNumber`) to be used as the job name in the SharinPix Form. |
| expiry | Number of days after which the url will expire. |
| anonymousUser | Specifies whether the SharinPix Form should be generated for anonymous access or for an authenticated Salesforce user. |
| formOnline | Specifies whether to generate a url that opens a SharinPix Form in Online Mode (On the Web Browser). |
| customParameters |
Additional user-defined parameters appended to the SharinPix Form launcher URL. Can add ret\_url, prefill values parameters and so on. (e.g. nameFieldApiName=Name\&pvInspectionName=Room\&ret\_url=salesforce1://)
|
## Flow Configuration Guide
The following flow setup uses a **Record-Triggered Flow** to automatically generate a SharinPix Form Url when a **Work Order** is created or updated.
### Step 1: Prepare Custom Field To Store URL
A field is needed on the Work Order object to store the generated URL. To do so, create a **Text Area (Long)** field to store the entire URL.
1. Go to **Setup** > **Object Manager** > **Work Order**.
2. Click on **Fields & Relationships** > **New**.
3. Select **Text Area (Long)** as the field type.
4. Name the field (e.g., `Form Url`) and set the length to the default value (`32,768` characters).
5. **Save** the field.
This field will store the full Form URL returned by the flow.

### Step 2: Configure a Record-Triggered Flow
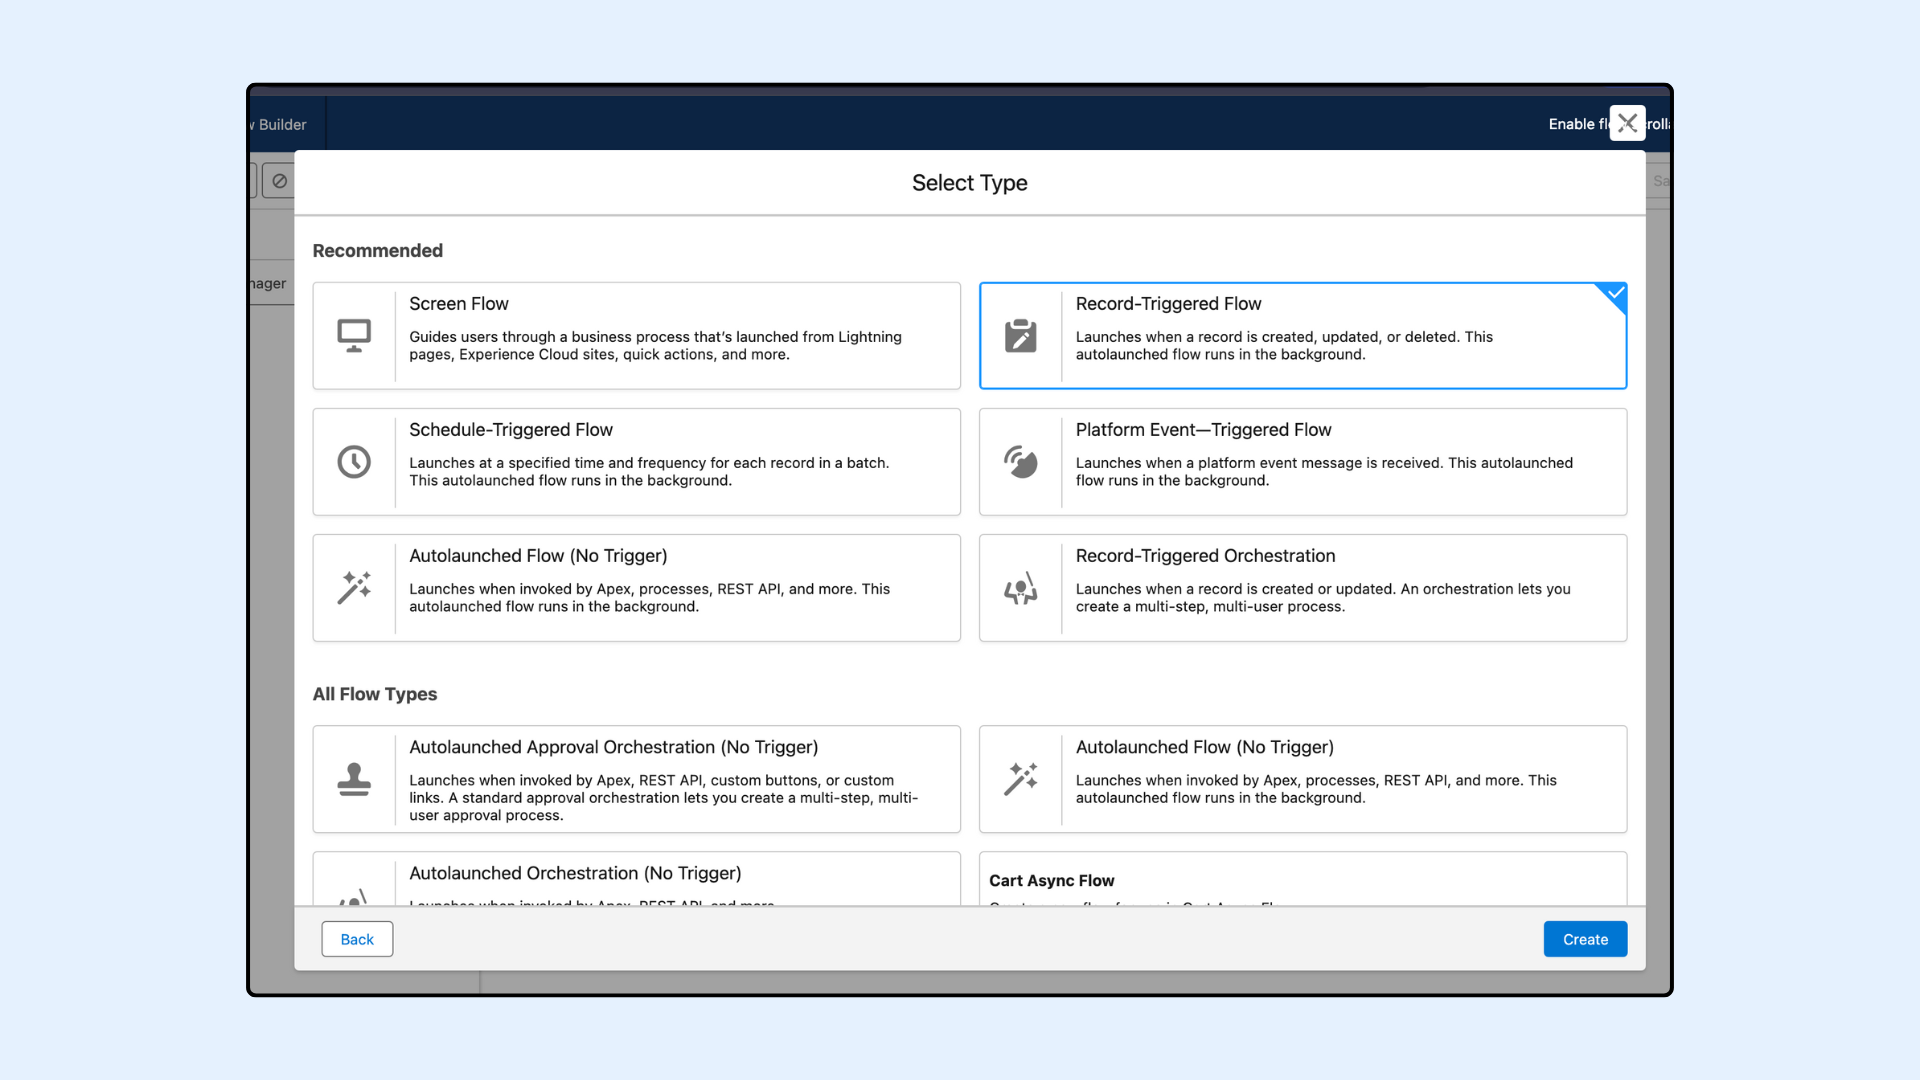
1. Go to **Setup** > **Flows** > Click **New Flow**
2. Choose **Start From Scratch** and click **Next**
3. Choose **Record-Triggered Flow** and click **Create**
4. Set the following values:
| Setting | Value |
| --------------------- | ------------------------------ |
| Object | Work Order |
| Trigger | A record is created or updated |
| Set Entry Conditions | None |
| Optimize the Flow for | Actions and Related Records |
### Step 3: Add the Action to Generate the Form Url
{% hint style="danger" %}
**Warning:**
Starting with the Salesforce **Winter’26 release** , Apex Actions can no longer be executed directly in the **Run Immediately** path of a record-triggered flow. Instead, they must be placed in an **asynchronous path** , as the synchronous execution option is no longer supported.
For more details, please refer to the documentation here:\
[*Unable to save a flow with an Apex Action after the Salesforce Winter ’26 release – What should I do?*](/faqs/i-am-unable-to-save-a-flow-with-an-apex-action-after-the-salesforce-winter-26-release-what-should-i.md)
{% endhint %}
1. Add an **Action** element
2. Search for `Sharinpix__GenerateFormUrlAutomation`
3. On the **Action** modal for `Sharinpix__GenerateFormUrlAutomation`, populate the fields as indicated below:
| Field | Example Value |
| ----------------------- | ------------------------------------ |
| Main Form Template Name | Fire Safety Inspection |
| Parent Record ID | Triggering WorkOrder > Work Order ID |
| Expiry in Days | 15 |
| Name Field API Name | WorkOrderNumber |
| Anonymous User | False |
| Custom Parameters | pvdate=09/05/2025 |
| Form Online | False |
{% hint style="warning" %}
**Warning:**
* If the expiry value is not specified, the token will default to 30 days. If the token should not expire, the expiry value should be set to zero (`0`). This field only accepts whole numbers; decimal values are not supported and will result in an error.
* Ensure the specified Main Form Template exists in your Salesforce org and that you have entered the correct name.
{% endhint %}
### Step 4: Add Update Element
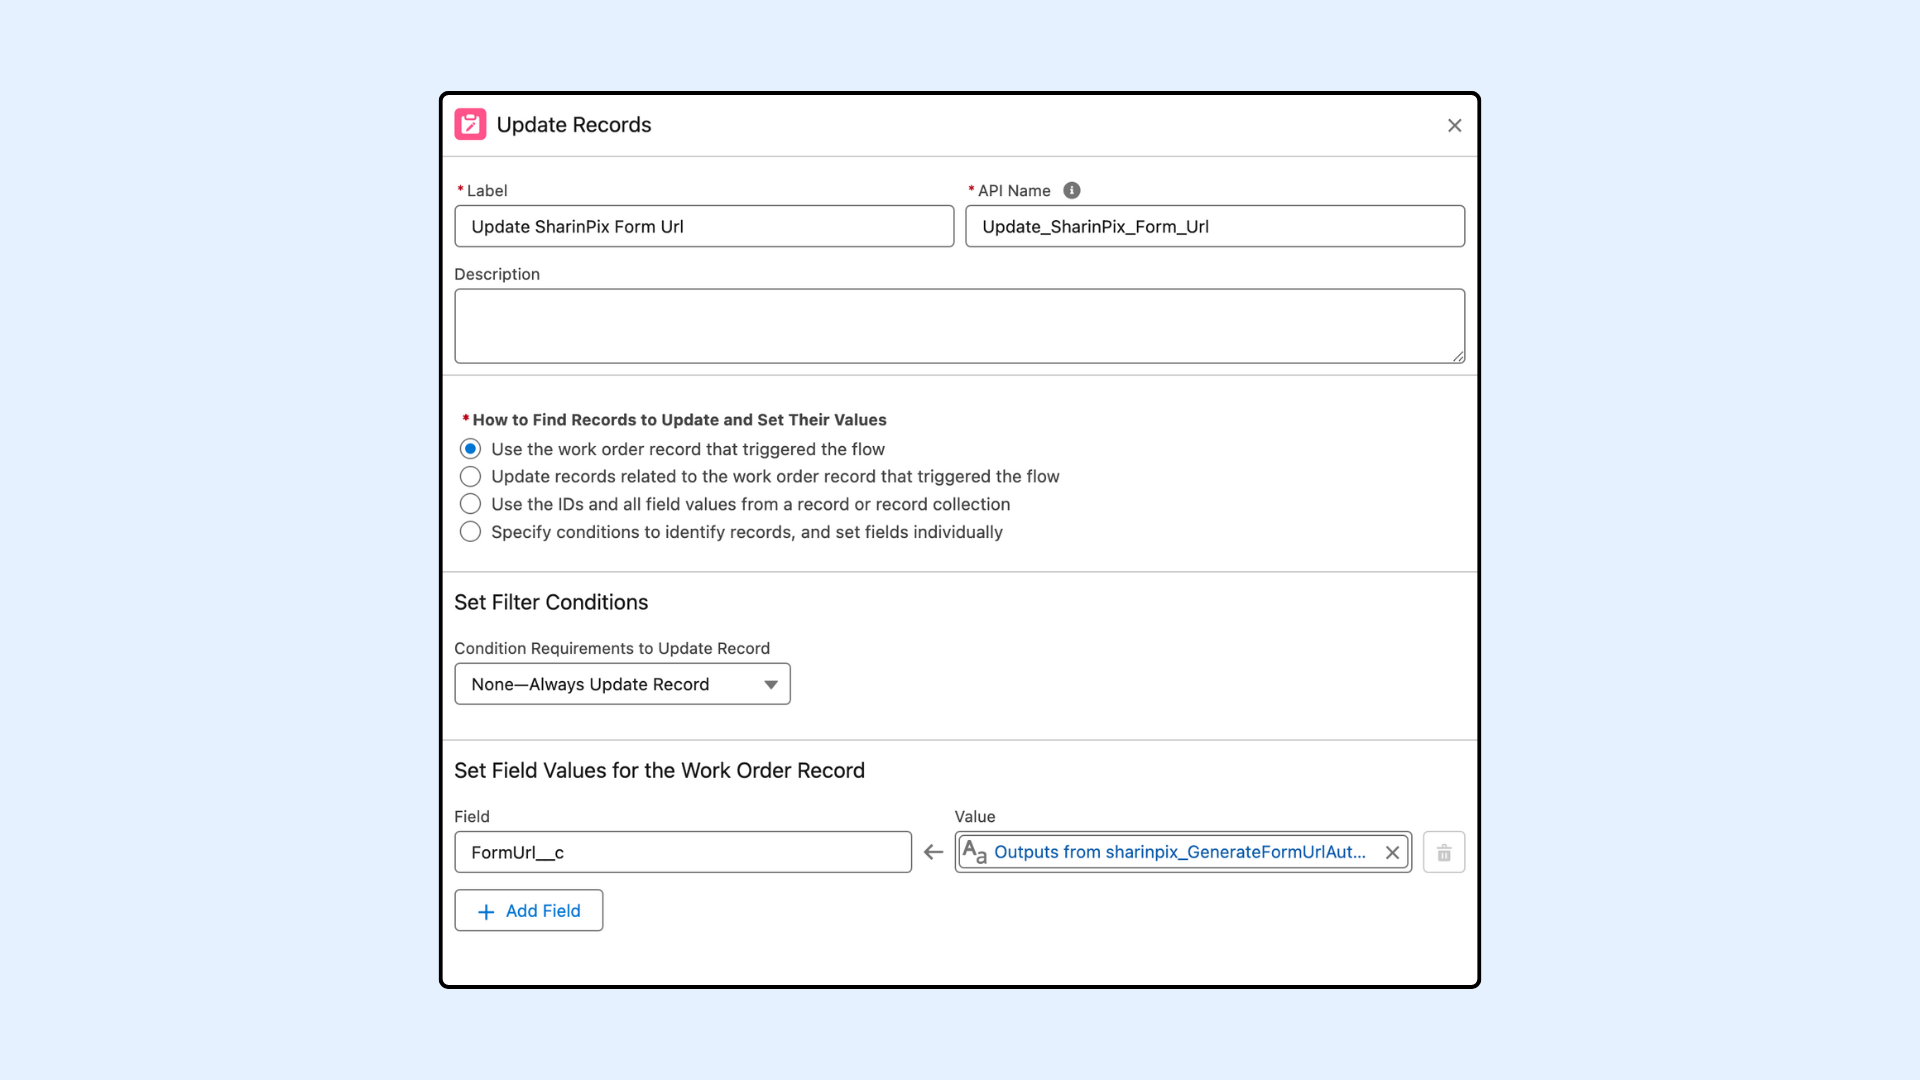
This step is used to store the url generated by the Apex action into the custom field `FormUrl__c` you created on the Work Order.
1. Add an **Update** element
2. Select **Use the Work Order record that triggered the flow**
3. Do not add any filter conditions.
4. In the **Set Field Values for the Work Order Record** section, populate it as indicated below:
| Field | Value |
| ------------ | ------------------------------------------------------------- |
| FormUrl\_\_c | Outputs from sharinpix\_\_GenerateFormTokenAutomation.formUrl |
### Step 5: Save and Activate the Flow
**Save** the Flow and click **Activate**.
.png?alt=media)
### Step 6: Find the SharinPix Form URL
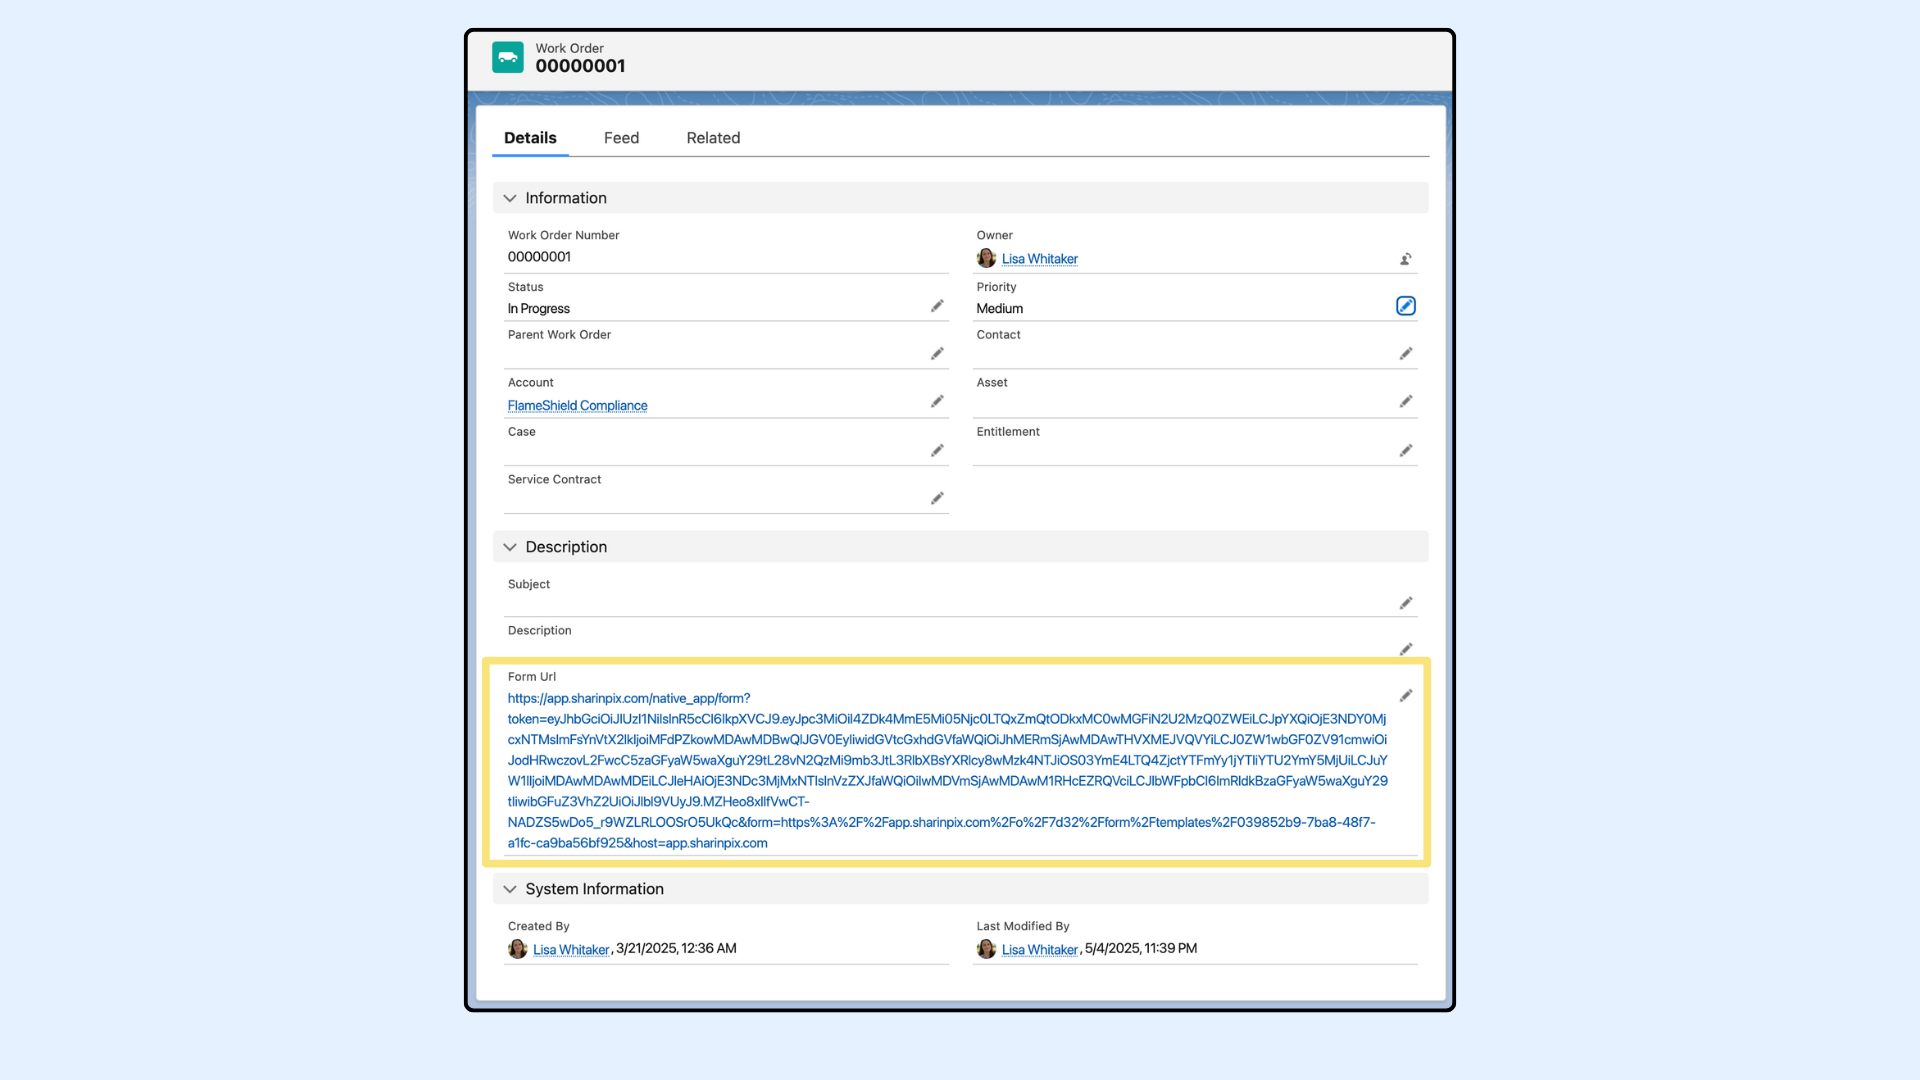
To test the flow, create or update a **Work Order** record.
After the flow runs, the generated **SharinPix Form URL** will be stored in the `FormUrl__c` field of the Work Order. You can view it directly from the record detail page to confirm that the token was generated successfully.
## Demo
The diagram below illustrates the interaction flow when a user clicks the form URL from a Work Order record, launching the SharinPix Form directly in the SharinPix Mobile App.

---
# Agent Instructions
This documentation is published with GitBook. GitBook is the documentation platform designed so that both humans and AI agents can read, navigate, and reason over technical content effectively. Learn more at gitbook.com.
## Querying This Documentation
If you need additional information that is not directly available in this page, you can query the documentation by asking a question.
Perform an HTTP GET request on the following URL with the `ask` and `goal` query parameters:
```
GET https://docs.sharinpix.com/documentation/sharinpix-form/automatic-form-url-generation-using-flow-admin-oriented.md?ask=&goal=
```
`ask` is the immediate question: it should be specific, self-contained, and written in natural language.
`goal` is what the user is ultimately trying to achieve, the reason they need the answer. Sharing it helps GitBook give you a better, more relevant answer. A goal is most helpful when it describes the outcome the user wants rather than restating the question. For example, with `ask=how do I create an API token`, a goal like `automate deployments from our CI pipeline` lets GitBook tailor the answer to that use case.
The response will contain a direct answer to the question and relevant excerpts and sources from the documentation.
Use this mechanism when the answer is not explicitly present in the current page, you need clarification or additional context, or you want to retrieve related documentation sections.
.png?alt=media)
.jpg?alt=media&token=716f3c4a-7627-49f1-85a9-774f0bce9831)